MICONNECT L1 – SOFTWARE MICONNECT- USER LEVEL
Welcome to MiConnect
Your All-in-One Notification Powerhouse
Welcome to MiConnect—your command center for managing communications. Whether you’re adjusting digital signage, fine-tuning audio broadcasts, or integrating new technologies like CCTV or vape detection, MiConnect puts total control at your fingertips.
What You’re Looking At
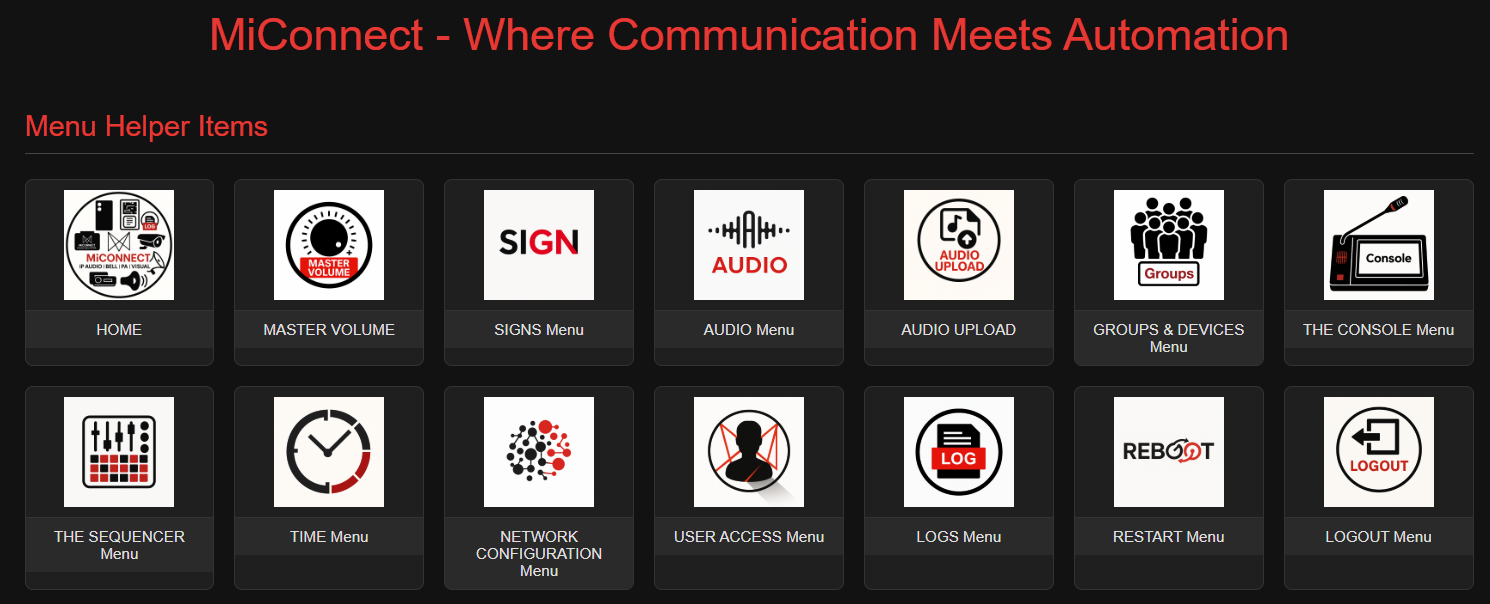
At the top of your MiConnect interface, you’ll find your essential management tools—your Swiss Army knife of system control. These include:
- Home
- Master Volume Control
- Sign Config Overview
- Audio Config Overview
- Audio Upload and Individual Volume Adjustment
- Groups and Devices
- The Console
- The Sequencer
- Time Configuration
- Network Configuration
- User Access and Logging
- User Access Configuration
- Logs and Log Downloads
- Restart
- Logout
Each icon on the dashboard provides access to a powerful feature set. Hover over any tool to see what it does, and click through to begin customizing your environment.
Beyond the Basics
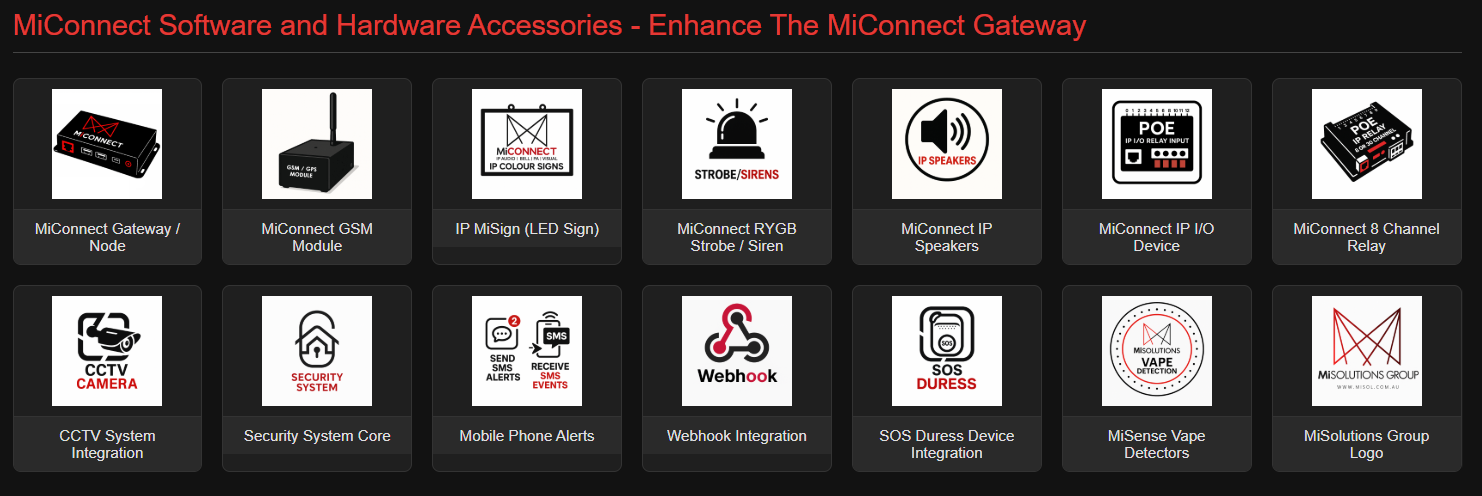
Beneath the core tools lies a powerful suite of expansion modules—advanced integrations designed for comprehensive system control. These modules extend MiConnect beyond audio and signage, incorporating systems such as:
• Security Camera Integration
• Vape and Air Quality Detectors
• Software and Hardware Input | Output
• Event and Alert Management
If you ever wonder, “Can MiConnect do more?”—the answer is likely yes. Our scalable platform was built with growth in mind, ready to support your evolving communication needs.
1. Audio Volume Control
Managing Your Gateway’s Master Audio Output
The Master Volume Console enables precise control of your MiConnect Gateway’s overall audio output level. This setting directly affects all audio playback—from scheduled announcements and ambient music to emergency alerts.
Key Features:
• Master Volume Dial A circular dial visually represents the current output level. The default reference point is set at 70%.
• Numerical Volume Display Just below the dial, the volume is shown as a precise percentage in red (e.g., 76%) for accurate adjustments.
• Real-Time Audio Meters Two vertical meters (Left and Right channels) offer live feedback on audio signal strength. Use these to confirm both channels are active and balanced.
• Set Volume Button After adjusting the dial, click “Set Volume” to apply and save the new setting.
• Last Adjusted Timestamp The interface includes a timestamp showing the most recent volume adjustment, ensuring transparency and accountability.
Best Practice:
This setting is gateway-specific, meaning each MiConnect Gateway maintains its own unique volume configuration.
Recommended Operating Range: Maintain volume between 50–80% for optimal clarity. Performance may vary depending on speaker types, installation location, and environmental acoustics.
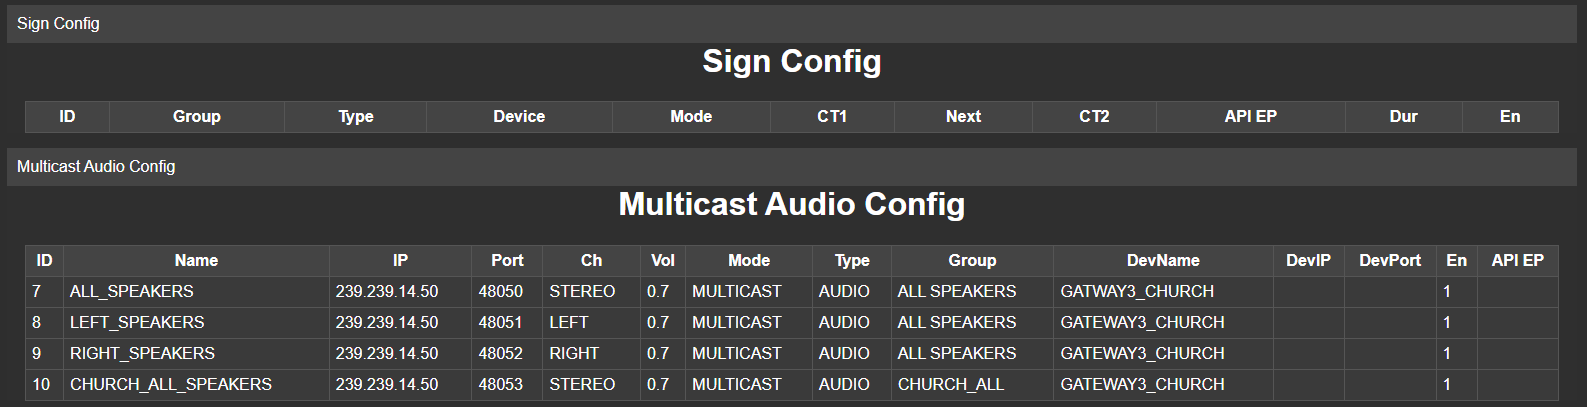
2. SIGNS Menu
The SIGNS Menu is your window into the programming and management of all your IP signs.
• Each sign features 30 programmable slots, assigned to specific functions—such as:
o Evacuation
o Lockdown
o All Clear
You’ll see both the full function name and a universal abbreviation (like “EVAC” or “WET”) that’s consistent across the entire MiConnect system.
The MiSolutions team or approved contractors handle the programming and customization of these sign slots. However, you can easily view what’s assigned to each slot.
• Whether it’s a standard message or a customized instruction—like an arrow pointing the way—our team ensures your signs display exactly what you need, when you need it.
• Our IP signs utilize seven-color P5 LED displays—simple, clear, and effective.
If you have unique requirements for specific signs or locations, simply reach out. We’ll handle everything, ensuring your entire site stays synchronized and ready to respond at a moment’s notice.


3. AUDIO Menu
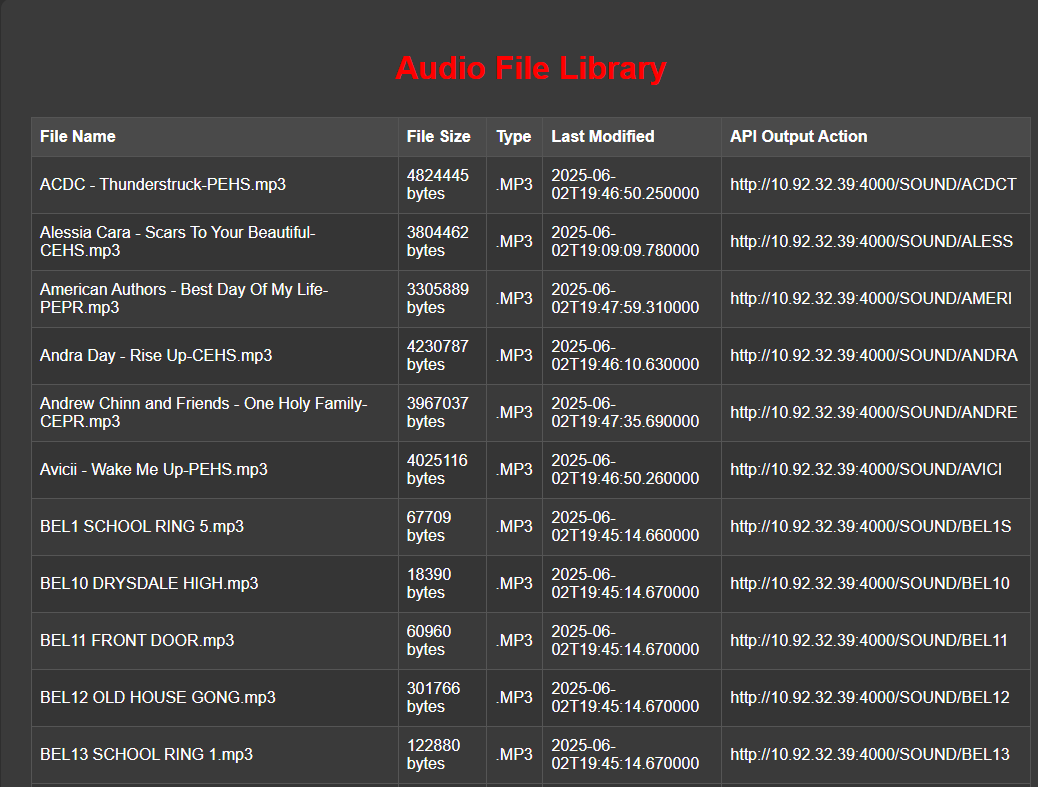
The AUDIO Menu provides a straightforward view of all the music folders available on your MiConnect system.
• Think of this menu as your directory for all non-emergency audio content, such as music tracks, that have been uploaded to your system.
• The menu displays a table listing each audio folder with detailed information:
o Track Name
o File Type (MP3 or WAV)
o File Size
o Last Modified Date
o API Endpoint (Direct link to trigger playback)
• Essential or emergency folders (e.g., Evacuation, Lockdown, or Vape Detectors) are intentionally hidden from this menu to avoid accidental misuse. These critical files remain secured and accessible only at the service level.
• Listing the API endpoints allows you to directly trigger audio playback from the console, ensuring optimal audio quality. Tracks play directly from each gateway, avoiding the loss of audio quality that occurs with streaming and compression.
This menu gives you the flexibility and clarity needed to deliver crisp, high-quality audio throughout your entire campus.
4. Audio Upload
We’re placing the power of audio management directly into your hands with the new Audio Upload feature.
• The Audio Upload menu enables easy upload of individual tracks or bulk music files directly into your general music folder. Once uploaded, these tracks instantly appear in your AUDIO Menu, ready for immediate playback.
• To upload, simply select your desired files and click “Upload.”
• Once uploaded, manage your tracks effortlessly with intuitive controls to:
o Play
o Stop
o Download
o Delete
***Note*** Individual volume control is a new feature through the Audio Upload section for the end user on NON Essential Tones.
This grants you complete control over your audio library, allowing quick updates and personalization to ensure the atmosphere across your campus stays vibrant and engaging.

5. GROUPS & DEVICES Menu
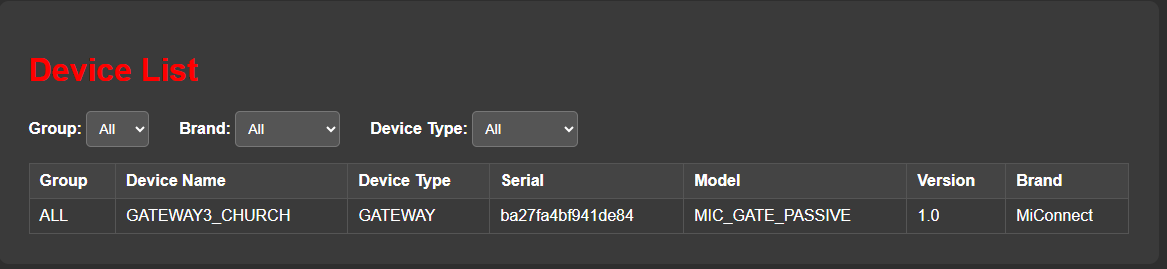
The Groups & Devices Menu provides a filtered, read-only view of all registered MiConnect devices within your network. It’s built for visibility and quick reference, enabling you to quickly identify active devices, their names, and groupings.
Filter Controls
At the top of the panel, you’ll find convenient dropdown menus to refine the displayed devices:
• Group: View devices assigned to specific locations or zones (e.g., ALL, ADMIN, BLOCK_C).
• Brand: Filter by device manufacturer (e.g., MiConnect).
• Device Type: Narrow down the list to gateways, relays, IP speakers, and more.
Device Table Details Each device listed includes:
• Group: The assigned group the device belongs to.
• Device Name: Friendly identifier for easy location recognition.
• Device Type: Defines the hardware category (e.g., GATEWAY).
• Serial: Unique device serial number, essential for licensing and validation.
• Model: Hardware class (e.g., MIC_GATE_PASSIVE).
• Version: Installed software or firmware version.
• Brand: Typically MiConnect, unless specific OEM integrations are involved.
Note: This table is read-only for end-users. All device edits, additions, or removals are handled exclusively through the Service Menu by a MiSolutions technician or authorized contractor.
The Groups & Devices Menu is particularly beneficial for troubleshooting, confirming device deployments, or preparing support requests. It provides clarity on what’s online and where each device fits within your broader system architecture—without the risk of accidental changes.
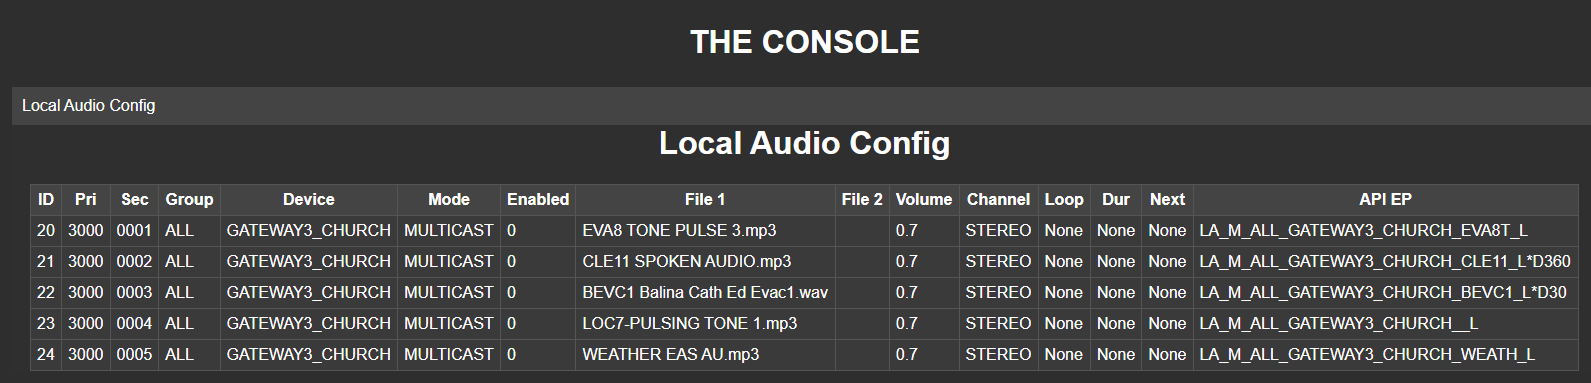
6. CONSOLE Menu
Think of the CONSOLE Menu as your quick-reference dashboard, giving you a concise overview of all active modules and their associated API endpoint names. From signs and audio to CCTV, security systems, or messaging—the CONSOLE provides a clear snapshot of what’s set up and how it’s identified.
• Each entry within the CONSOLE corresponds to a shorthand API endpoint name, reflecting actions and configurations established on the backend. This allows you to easily cross-reference and quickly understand the function of each endpoint.
• When creating action sequences in the SEQUENCER Menu, these API endpoint names become your building blocks, enabling you to accurately assemble commands for your desired sequence of actions.
In short, the CONSOLE Menu offers clear visibility into your system’s configuration, showing at a glance each module’s endpoint name—helping you quickly integrate and trigger the precise actions required by your sequences.
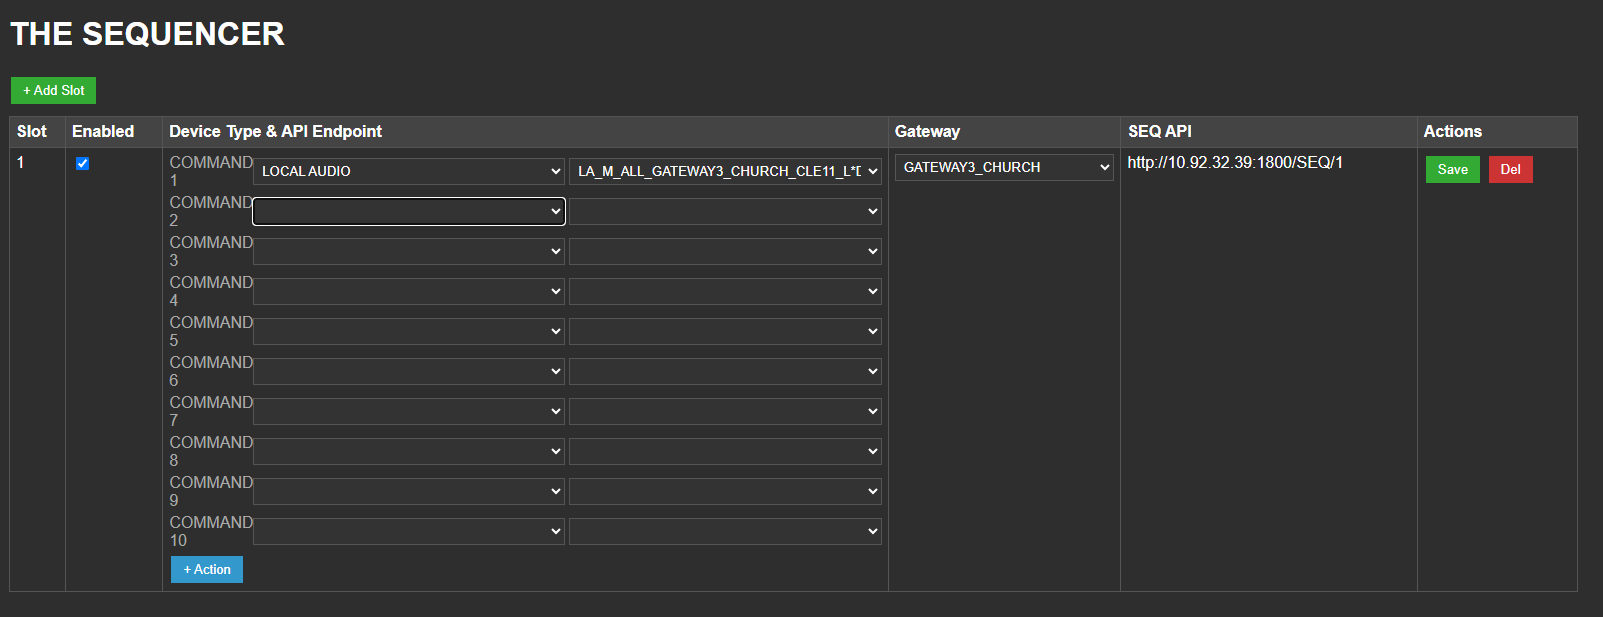
7. SEQUENCER Menu
The SEQUENCER Menu is where the real magic happens. With unlimited slots and up to 10 commands per slot, you can orchestrate intricate sequences that seamlessly combine actions from multiple modules.
• Each module, such as signs or audio, is enabled through a product key. The SEQUENCER allows you to assemble and chain these actions using their API endpoint names, as listed in the CONSOLE Menu.
• Triggering a sequence (e.g., http://your-gateway-address/seq/1) executes all assigned commands rapidly and precisely, timed down to the millisecond.
This capability enables you to coordinate multiple actions simultaneously, such as:
• Playing an audio file
• Displaying a message on IP signs
• Sending SMS alerts
—all activated from a single sequence trigger.
The SEQUENCER provides a powerful, streamlined method to manage and automate sophisticated event sequences throughout your entire MiConnect system.
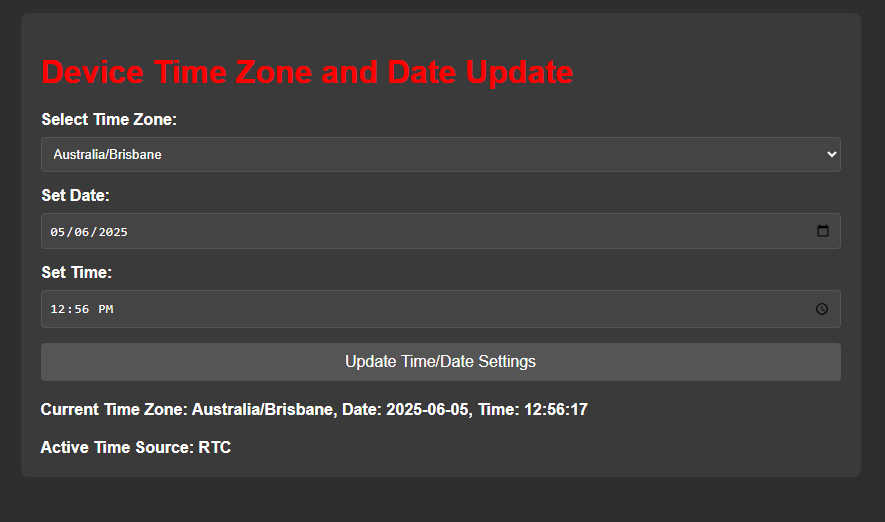
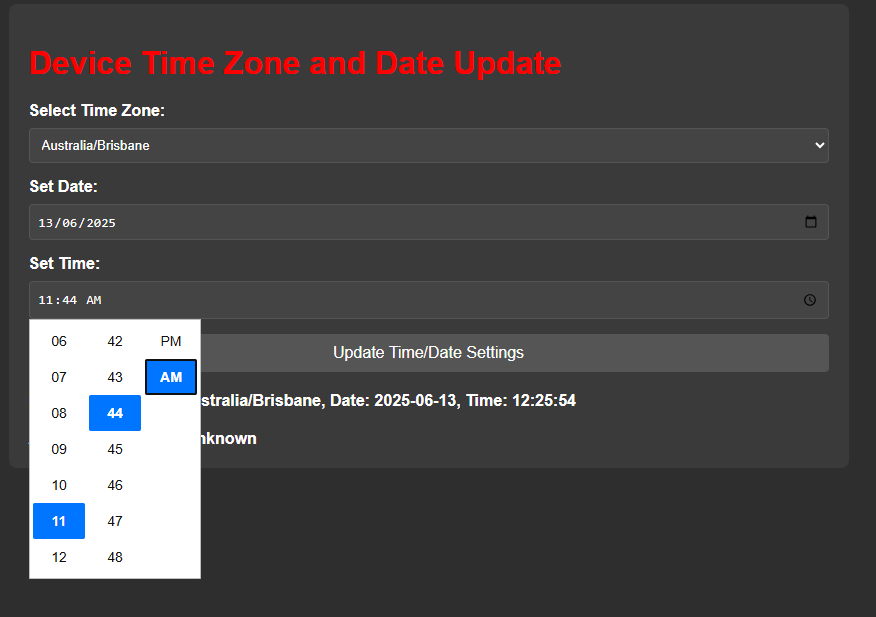
8. TIME Menu
The TIME Menu is your go-to spot for managing and synchronizing your system’s date and time.
• Begin by selecting your desired time zone from a dropdown menu, conveniently listing regions by their UTC offsets.
• Below the time zone selector, you can manually enter the date and time, or quickly sync them with your computer’s current settings by clicking the calendar and clock icons.
• A convenient checkbox is available to enable or disable daylight savings adjustments as needed.• For automated precision, the system can be synchronized with an NTP (Network Time Protocol) server. If you prefer this method, simply reach out to MiSolutions Group or your service contractor, who will handle the backend configuration.
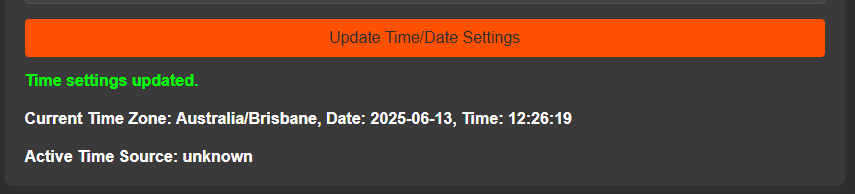
• After finalizing your selections, click the “Save” button to update your system’s time settings.
This ensures your entire MiConnect system stays accurately synchronized, supporting precise and timely communications across your campus.

9. NETWORK CONFIGURATION Menu
The NETWORK CONFIGURATION Menu manages the connectivity settings of your device, including both Ethernet and Wi-Fi connections.
Ethernet Settings
• A checkbox labelled DHCP allows automatic IP assignment.
• If this box is unchecked, you’re using a static IP address, which is recommended to ensure stable and reliable communication, particularly crucial during events like evacuations or lockdowns.
• A static IP prevents disruptions caused by network resets or unexpected changes in IP assignments.
Important: If you’re uncertain about configuring static IP settings, please contact your IT support team for assistance.
Wi-Fi Settings (if applicable)
• If your device has Wi-Fi capability, select your desired SSID from the dropdown menu. This is primarily used for establishing temporary hotspot connections (such as via your mobile phone) for remote support.
• After connecting to a hotspot, click the “Connect to RustDesk” button. This opens a new browser window displaying instructions along with a one-time connection ID, allowing remote support to connect and assist you directly.


10. USER ACCESS Menu
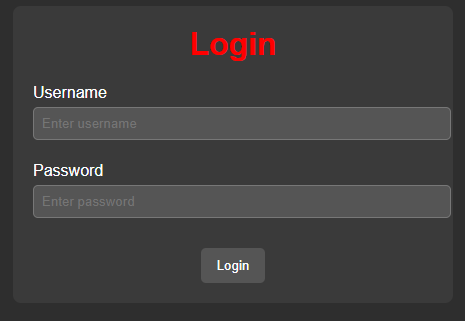
The USER ACCESS Menu allows full management of user accounts within the MiConnect system.
• From this interface, you can add, edit, or delete user accounts. There’s no limit to the number of accounts you can create.
• Each user is assigned a unique username and password, granting them access to the full user section of the platform.
Note: There are no partial access roles or permission tiers. All user accounts created here receive full access to user-level controls.
This means user management should be handled responsibly—ensure that only authorized personnel are granted credentials.
• To apply changes after creating or modifying a user, make sure to click “Save” to update the user database.
Properly managing user access helps maintain system security while ensuring the right people can operate the platform effectively.


11. LOGS Menu
The LOGS Menu offers a deep dive into all behind-the-scenes activity within the MiConnect system. It serves as a comprehensive tool for monitoring system health, diagnosing issues, and tracking events across all modules.
• Hover over various system modules to access their daily log files:
o Local Audio
o CCTV Module
o GSM Modules
o Network Configuration
o Input/Output Modules
o Users
o The Sequencer
o Signs, Sirens, SMS, and more
These logs operate on a 30-day rotation, ensuring current, relevant diagnostic data is always available.
• When you click on a specific category, the logs will appear in timestamped format, organized by:
o Event
o Date and Time
o Status Messages (e.g., “Playback finished”, “Audio playback terminated”)
Sample Log Entries:
2025-05-26 16:39:33,429 INFO: Audio playback terminated. 2025-05-26 16:40:03,430 INFO: Playback finished 2025-05-29 18:27:57,659
INFO: Audio playback terminated.
• Some logs can be extensive, but you can scroll through them and use the Print or Save buttons at the bottom to export logs as PDFs for reporting or support.
While some logs may appear technical, they’re a valuable first layer of diagnosis. If issues arise, support teams may request specific logs to resolve problems efficiently—often without needing immediate remote access.


12. SYSTEM UPDATE, RESTART, AND LOGOUT Menus
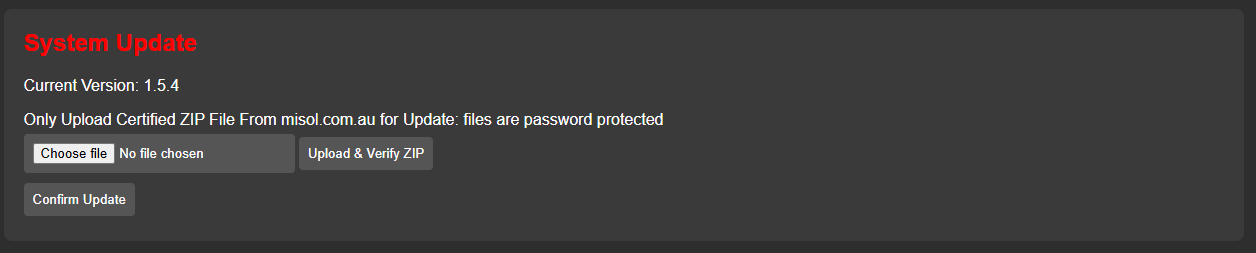
System Update
The System Update section provides a secure and simple way to upgrade your MiConnect system.
• The current version number is displayed (e.g., version 1.5.4).
• Only certified zip files from misol.com.au are accepted. These files are password-protected and auto-extracted by the system, ensuring update integrity and security.
Steps to Update:
1. Download the latest update zip file from the website.
2. Click “Choose File” and select the downloaded zip.
3. Click “Upload and Verify Zip”.
4. After verification, confirm to proceed with the update.
5. Once complete, the system will prompt you to restart to apply the changes.
Restart
The Restart menu allows you to safely reboot the system.
• Clicking this option will prompt you twice for confirmation before initiating the reboot.

Logout
The Logout option securely signs you out of the system.
• If you forget to manually log out, the system enforces security by automatically logging you out after 10 minutes of inactivity.
These options ensure your MiConnect system remains secure, current, and running at peak performance.
DOWNLOAD THE BAELINE MICONNECT MANUAL HERE……..