MICONNECT L1 -LESSON 16 – MiConnect Gateway S Model – Microphone
Microphone (Gateway S)
Smaller than a PA technician’s tool chest, but every bit as useful.
What it is
The MiConnect microphone subsystem is the simple, reliable front-end for live voice paging and annunciations. It’s three parts working together: (1) a quality USB desktop/gooseneck microphone, (2) a small zone-selector/PTT box for operator control, and (3) the Gateway web UI that manages mic gain, multicast zone assignment and pre/post-amble sounds.
What it can do
-
Live paging into any of the three multicast zones (CH1 / CH2 / CH3).
-
Push-to-Talk (PTT) hardware control for professional, low-latency paging.
-
Digital mic gain control and persistent saved settings via the Gateway UI.
-
Upload custom PREAMBLE.mp3 and POSTAMBLE.mp3 audio files to play automatically before/after mic audio.
-
Assign each mic channel to one or more multicast groups for flexible zone targeting.
-
Download/upload and store preamble/postamble assets on the unit (local SSD) for offline reliability.
What sets it apart
-
Headless simplicity — plug a USB mic into the local console and the Gateway does the rest.
-
Fine-grain digital control — adjust pre/post gains and mic gain from the browser UI without touching the hardware.
-
Multicast-aware — mic output can be routed to any combination of multicast zones for precise coverage.
-
Designed for schools and small sites — low complexity for operators, high control for technicians.
Why we developed it
To give site operators a familiar, reliable paging input that’s quick to install and easy to use, yet powerful enough for multi-zone, audited deployments without needing expensive console hardware or proprietary mics.
Metaphor
👉 The mic subsystem is like a radio operator’s headset and switchboard: you speak, press the switch, and the right people (and speakers) hear you — exactly when they need to.
Physical components & placement notes
-
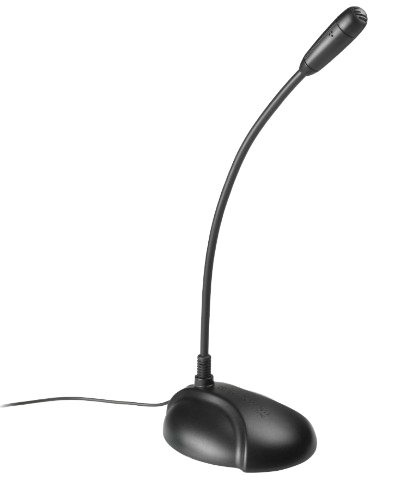
USB gooseneck microphone (recommended: Audio-Technica style desktop dynamic with no buttons) — plug-and-play into the console’s USB.
-
Zone selector / PTT box — a small, hardwired push button to gate the mic signal to the assigned zones.
-
Gateway console — close proximity to the mic is advised; if you place the mic remotely, use an active USB extension cable and keep runs under ~10 m to avoid data dropouts.
Practical tip: mount the mic and PTT where the operator can clearly see status LEDs (or the web UI) and easily press PTT without leaning away from the mic.
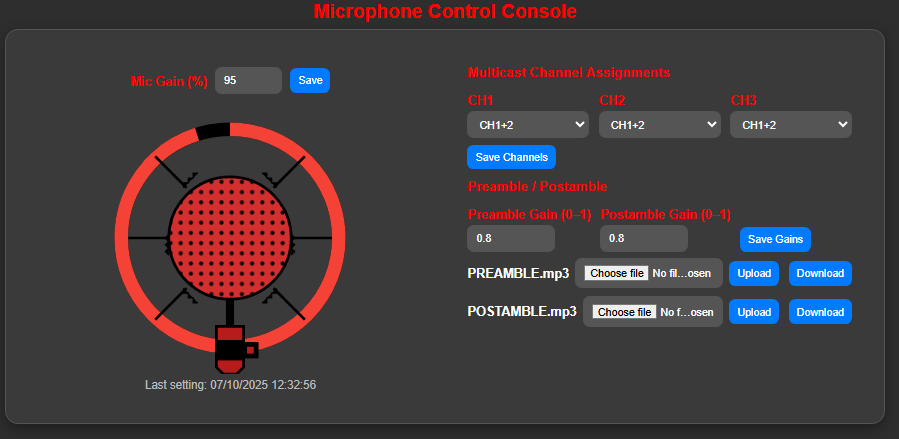
UI features (what you’ll see on the console)
-
Mic Gain % control (saveable) — digital gain applied to the USB mic stream.
-
Multicast Channel Assignments — dropdowns to map mic to CH1 / CH1+2 / CH1+2+3 etc.
-
Preamble / Postamble gain (0–1) and file upload controls (PREAMBLE.mp3 / POSTAMBLE.mp3).
-
Upload / Download buttons for audio assets and a visible “last setting” timestamp.
-
Simulation/preview field (see next section) to confirm what will play.
Recommended audio format: short MP3 pre/post files, mono, 44.1 kHz (keep them short — 1–5 seconds for tones, slightly longer for voice messages).
Hands-on lesson — setup & practical exercises
Below are mapped steps you can follow in a practical lesson. Follow them sequentially during the class; the exercises are intentionally hands-on so learners touch hardware and software.
-
Unbox & connect
-
Plug USB mic into Gateway console USB.
-
Connect PTT box to the console’s mic/PTT input.
-
Power on Gateway and verify status LEDs.
-
-
Verify OS & USB recognition
-
Open Gateway web UI → Mic section.
-
Check that the mic appears as an input (if not, re-seat USB / try another port).
-
-
Basic mic test (live)
-
Press and hold PTT; speak a short phrase.
-
Verify audio appears at the selected test speaker or local amp.
-
Release PTT and confirm audio stops.
-
-
Set initial digital gain
-
Start with conservative gain (e.g., 60–80% as a baseline) and adjust upward while speaking.
-
Watch levels visually (if UI shows meters) and avoid red clipping. Save settings.
-
-
Assign multicast zones
-
Use the dropdowns to assign CH1 / CH2 / CH3 combinations.
-
Test each assignment by paging and confirming audio reaches intended zones.
-
-
Upload preamble/postamble
-
Prepare two short MP3s (preamble = tone or “attention” prompt; postamble = tone or “clear” prompt).
-
Upload PREAMBLE.mp3 and POSTAMBLE.mp3 in the UI. Set pre/post gains and save.
-
Test with PTT: confirm preamble plays before live paging and postamble after release.
-
-
Advanced: pre/post gain & timing
-
Tweak pre/post gains to smoothly blend tone into speech (avoid sudden level jumps).
-
Verify there’s no audible cut at release — use slightly longer postamble if needed.
-
-
Role-play exercises (operator training)
-
Drill 1: Morning announcement sequence (preamble → announcement → postamble).
-
Drill 2: Emergency page (predefined tone + short instruction) — ensure operator knows approval flow.
-
Drill 3: Fault simulation (disconnect mic) — walk through recovery steps.
-
-
Audit & save
-
Check the “last setting” timestamp and save a config export for site records.
-
Teach operators how to rollback to a previous saved config if needed.
-
-
Troubleshooting checklist (quick)
-
No audio: confirm PTT wiring, USB recognized, mic gain not zero, output amp on and volume up.
-
Dropouts: try a shorter active USB cable or move mic closer; check USB ports for power issues.
-
Preamble missing: validate file uploaded correctly, file format compatible, preamble gain > 0.
-
Wrong zone: re-check multicast group mapping and network multicast routing on site switches.
Best practices & site-fit notes
-
Keep the Gateway console near the mic when possible; active USB cables increase distance but raise dropout risk beyond ~10 m.
-
Use a mic with a simple unambiguous PTT workflow (no on-mic buttons) to avoid accidental muting/changes.
-
Store frequently used PRE/POST files on the unit’s local SSD for offline reliability.
-
Use role-based permissions: only authorised operators should be allowed to trigger sensitive actions (e.g., unlock gates during a page).